The variety of different tent options available today can be puzzling. While back in the day, you might have had the choice between a dome and a tunnel tent, now there are pop up and inflatable tents offering instant pitch, geodesic tents, and even tents designed to be pitched on trees.
One tent design, that has seen a come back in the recent years, is the teepee, or tipi. In it’s most simplistic form, a teepee has a single pole carrying a canvas, which is attached to the ground with rope and pegs. Usually, there is no floor and the ceiling has some kind of opening for ventilation and a way out for the smoke, should you have a fire or a stove inside.
This design predates most other models, as it was used by both the native Americans and the Sami of Scandinavia and Russian arctic, as a base for their nomadic lifestyle. (In Scandinavia the tent has traditionally been referred to as Lavvu or Kota.)
As teepees tend to be quite large and the center pole adds to the weight, they are usually best suited to be used as a base camp, rather than on multi day backpacking trips requiring carrying everything in your backpack.
Western Soul teepee tents
Western Soul is a South-Korean manufacturer of teepee tents and other outdoor products. The company got started in 2008 with the tent production first taking place in the owner´s garage. Proper production facilities were built in 2012, and the company has been manufacturing the teepee tents with large western-motif prints ever since. Today the Western Soul teepees are very popular in South Korea and getting more well-known in other Asian countries, as well.
What sets the Western Soul teepee tents apart from the competition, at least visually, are the large prints, which every tent comes equipped with. As the name suggests, the motifs for the prints mainly derive from the Wild West – native Americans, cowboys, eagles and wolves are among the images you can choose when buying the tent.
According to a company representative, the Western Soul tents are designed for four seasons and are suitable for both beginners and avid campers, and can be used at camping grounds, as well as in pristine nature.
The test tent
My choice for the test out of the Western Soul teepee lineup was the Big tent, mainly because I thought it would be the right size for a small family or a group as a base camp. The Light would be probably better for a couple of people and for the Great you would really need a big posse of friends or lots of camping furniture to really benefit from all the space.
As for the print motif, I chose the Wolf, which can be found roaming in the forests of my country of residence, Finland. Because of the abundance of mosquitoes and midges here during the summer, I opted for the mosquito nets on both tent doors and ceiling ventilation, which comes at extra cost.
First impressions
The Western Soul teepee tent arrived packed in a branded black corduroy bag with red carrying handles and two compression straps. The dimensions for the bag are roughly 60x50x38 cm and when tested with a fishing scale it weighed in at slightly over 12 kgs with the tent canvas and hood construction + flysheets inside. The main pole is divided in five sections, which were packed in a separate brown corduroy bag, approximately 95 cm long and weighing in at around 4,5 kgs.

Inside the black storage bag, I found the main teepee canvas, together with the mosquito nets, and a small pouch containing a set of tent cords and tensioners, as well as a rectangular (width: 43 cm) canvas cloth with a hole in the middle, and a nylon strap, measuring just shy of 3 meters. Finally there was a simple one-page instruction manual on how to pitch the teepee.

The tent is neatly folded in the storage bag, together with the accessories pouch made of the same canvas as the actual tent. The colour of the teepee could be described as a pale khaki, where as the ceiling top and the hems of the tent are dark brownish.
At first glance, the materials used in the actual tent, as well as in the mosquito nets and in the more sturdy tent hems, all give you the impression that, when sourcing for the materials, the manufacturer has preferred quality over price. The stylish pale khaki colour with the very nice print work add to the impression.
Pitching the tent
Since this is my first time pitching a Western Soul teepee tent, I follow the instructions: “begin by placing the small rectangular canvas cloth on the ground, in the spot you would like the centre pole to be located in”. I continue by hammering a tent peg through the hole in the middle of the canvas, and then put the metal ring found at the end of the 3-meter-long nylon strap through the peg as well.

Grabbing the other end of the nylon strap and walking a full circle with the strap tensioned, enables you to check whether the teepee will fit into the desired place. (You just have to make sure the other end remains fixed in the peg.)
The sole tent peg in the middle of the small canvas cloth marks the position of the center pole, while the tensioned nylon strap draws a circle the size of the teepee about to be pitched. (This is all explained in the simple instruction manual that comes together with the tent.)
When I pulled out the tent from the storage bag and started unfolding the canvas, I was surprised by how large even the mid-sized Big actually was, and for this reason, measuring the diameter of the ground area covered by the canvas, as mentioned above, is advisable.
Next thing the instruction manual advices me to do, is to fix the three-meter-long nylon strap tensioned on the ground, and still attached to the center pole location, by hammering a peg through the other end of it, as well. I then take out the teepee canvas and pull one of its ground attachment loops through this peg.
This is followed by driving a peg through all the metal loops found at the hem circling the teepee canvas. After this, the teepee should be firmly attached to the ground by pegs going 360 degrees around the center pole location defined in the beginning by using the small rectangular cloth.
You can have a look at what the pitching process looks like by clicking play and watching this video.
Up to this point, it is all really very simple, and there is basically only one thing left to do, and that is to pull up the main pole of the tent, which will then, of course, also erect the tent. This procedure should also be fairly simple, according to the instructions: you have all-together five tent pole sections made of steel, of which one is slightly shorter, and another has a protective rubber end.
The short one goes on top, while the one with the rubber end is meant to be put on the ground – the rest of the parts fit in the middle. All the pole sections have pre-drilled holes in them, which are used to secure the push-through nobs found in the slightly narrower ends of the pole sections. (Similar construction found in most collapsible tent poles.)

After assembling the center pole, you will then have to actually erect the whole teepee with it, which is the trickiest part of the process. On my first try, I found out, that the tensioning of the ground pegs is better to do AFTER erecting the tent. Because I had already done it before hoisting up the main pole, I had to use excessive amount of force to erect the center pole, which meant that some of the ground pegs came off.
Having said that, I did probably use too small pegs for a tent this big. (I was using light aluminium pegs meant for a backpacking tent, where as a teepee of this size would be better off with heavy, quite long steel pegs, which you can hammer in to the ground.)
I also noticed that it is a good idea to go through the ceiling section of the teepee and make sure all the straps used for controlling the ventilation are free of any tangles, before attaching the top part of the center pole in the connecting short section of metal pole found in the ceiling. (Otherwise, you may risk noticing the ventilation straps are tangled, after the teepee is already erect, which means additional work in bringing the tent down for fixing the problem, and having to hoist the center pole up once more.) After doing this, I was able to erect the WesternSoul Big teepee by myself in one go.

After the tent was erected, I went through the ground pegs one more time and made sure all the straps were properly tensioned. I also took out a couple of extra tent cords and tensioners from the accessory pouched and secured the teepee from opposite sides, using the many loops found on the canvas circling the tent.

For such a big tent, I found pitching the Western Soul teepee tent fairly easy, the instructions are very simple, it’s all on one-page, and with the help of the center pole placement cloth and the adjoined surface area measurement strap, even a complete novice should be able to define the right camping spot and secure the teepee on the ground. Hoisting the main pole up was slightly laborious to do by myself, so you would probably be better off, if you have someone to help you, at least on your first try, providing you’re not an expert of feel you might lack the strength for the job.
Field test in the wild
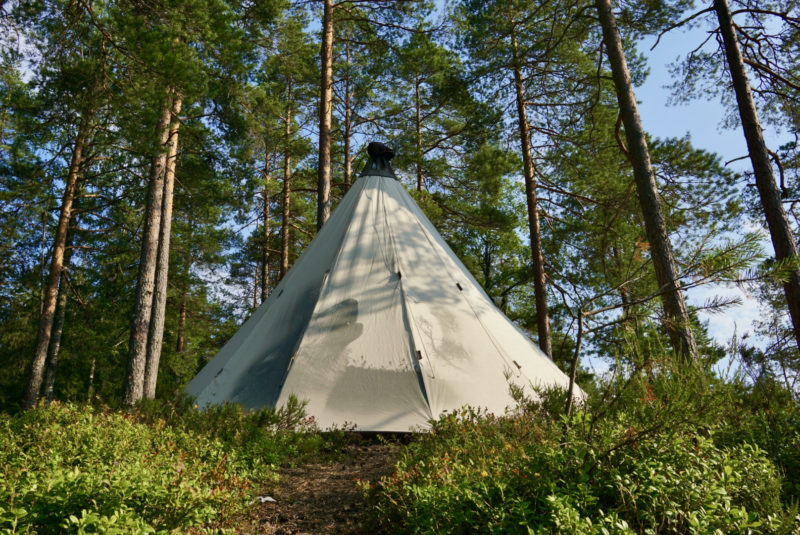
Although I slept the following night in the teepee at the first pitch site without problems, I wanted to take out the WesternSoul Big in the woods to test it in more pristine surroundings. For the test location I chose the Nuuksio National Park, close to my home city of Helsinki. While the most popular areas of the park see hordes of tourists these days, you can always find secluded spots with few other people in sight, if you are willing to take make the extra effort to plan your own route with the help of a map and compass, rather than ready-made sign posts by the park staff.
Having reached the camp site, after a somewhat strenuous hike in the heat, I decided to set up the camp and pitch the teepee as quickly as possible, so I could enjoy the rest of the day worry-free. When looking for the right place to pitch the tent, I noticed that in countries like Finland, with dense forests, you really have to take in consideration the large surface area needed for a teepee this size.

For this reason, I have to make the most out of the camp site area, and pitch the teepee in a place, where one of its corners comes very close to a tree. On this corner, I have to be creative when attaching the ground pegs. Another obstacle is the uneven ground – due to the large surface area of the teepee, it is impossible to find a big enough area, which would be totally even and without any tree stumps or rocks.
Overall, none of these things matter much though – I use a couple of the nearby trees as anchors to attach the teepee with the accessory cords, and I go round or over the rocks to secure the ground peg straps with additional cords. This is just something you should take into consideration, when using a teepee this big for camping in the wild: on the green grass of a public camp site, you will always have perfectly even terrain with a surface that is very easy to drive the pegs into – in the wild, you sometimes have to wing it.

Another thing the uneven terrain affects slightly is the placement of the hems of the teepee. Made of heavy duty nylon, the hems are designed just long enough to enable them folding back towards the center of the tent, after first reaching the ground. The idea is that it will block the wind and rain, as well as the mosquitos, without the need to have a ground floor.

When you have an uneven terrain, with one end of the teepee on the upslope and the other on the downslope, it can have the effect where some sections of the hem are being pulled up, creating an exposed area. However, I found that you can solve this by controlling the tensions of the ground pegs in the area – adding more tension, will help pulling the hems down.
The construction of the peg straps are very clever: there are two metal rings at the ends of two nylon straps stitched together, which in turn moves freely between another two metal rings found inside a small loop attached to the hem of the tent.

The idea is, that you first pull the whole length of the nylon strap combination on one side and attach one of the metal rings to a tent peg. After you have attached all the tent pegs around the tent, you can adjust the tension by pulling also the other metal ring through the peg as well. This will shorten the length of the nylon strap by 50%, and will of course tighten up the tent considerably. Very simple, yet clever way of anchoring the tent and also adjusting the tension.
Besides the challenges posed by the camp site terrain, pitching the teepee for the second time is easy. Upon entering the now erect teepee, I first make sure the fly sheet is properly attached to the two opposite main doors, in order to not let any of those nasty mosquitos in.
Then, I pull down the strap coming down on the main pole from the ceiling of the teepee, and fix the metal hook at the end into the hole at the bottom of the center pole. After doing this, I can use the four different cords attached to the strap, which are connected to the ceiling “hood”, and control the amount of ventilation at the top of the teepee.

When in the fully open position, you could probably fit the pipe of a small tent stove through the opening, and when fully closed, the hood blocks the rain. On my test version, a fly sheet has also been added to the opening, so that you can ventilate the teepee without fear of midges or mosquitos getting inside.

Due to the unusual heatwave, I unzip both of the main doors fully open, leaving only the mosquito nets zipped in. The smaller door canvas I simply roll up, but I use the accessory tent cords to fix the wider door canvas around a couple of pines right next to the entrance. This creates a sun shade larger enough to place your sleeping pad under it.

For a person more used to using light backpacking tents, the general feeling, once inside the teepee is awe for how big it is – you could easily fit my whole family inside, together with the gear, camping furniture and a stove. With the pale khaki canvas, and the nordic midnight sun, there is also a lot of light inside of the teepee, an effect which is only enhanced by the two opposite open doors.


All and all the field test weekend went without problems, although the unusual heat wave made me wish I had brought a couple of beers with me. My only gripe regarding the test was, that I did not get a chance to use the teepee tent in rain, so I will have to add my experience in spending a rainy night in the teepee later on.
Final conclusion
After the test, my overall impression of the WesternSoul Big teepee tent is very positive: the materials and workmanship, as well as technical details seem top notch. It is clearly a high quality product, made by people, who enjoy camping themselves, with the intention of creating a long-lasting classy product.
This, of course comes with a price tag – 1350 USD, to be precise. You can probably find a cheaper mass-manufactured teepee tent, but not made of materials off this quality or such well-thought technical details. And, let’s not forget the unique prints either, the trademark of the brand.
As such, I can easily recommend the WesternSoul Big teepee tent for anyone, who is looking for a quality teepee tent of this size (around 4-6 people) for a base camp style use, car camping or glamping.


Sizing and prices
The Western Soul teepees come in three different sizes: Light, Big and Great. The dimensions and weights for these are (the weight does not include tent pegs):
- Light: 4,5 x 4,3 x 3,2 m, 12 kgs (with 10 corners)
- Big: 5,2 x 5,2 x 4 m, 16,5 kgs (with 12 corners)
- Great: 6,2 x 6,2 x 4,8 m, 21 kgs (with 14 corners)
The respective prices for these are:
- Light: 1150 USD
- Big: 1350 USD
- Great: 1550 USD.
Materials
All the Western Soul tents come with the tent, a storage bag, main center pole in five sections (+storage bag) , support strings and stoppers. Tent pegs are sold separately.
Western Soul teepees use a Cotton N/P fabric mix, which consists of approximately 40% cotton, 40% polyester and 20% nylon.
As a result, the tents should be breathable, yet water-resistant. According to a company representative, the tents have been tested by the Korea Apparel Testing & Research Institute (KATRI), where they received a waterproof rating of 1130 mm.
The tents can be also used together with a stove, the ceiling opening providing enough clearance for the chimney pipe.
All Western Soul tents are made in South Korea.
Pros:
- High quality materials and workmanship
- Well-thought technical details
- Adjustable hood ventilation
- Clever hem design & ground attachment eliminates need for floor
- Multiple doors and tent cord fixing points on canvas
- Mosquito nets available for both doors and hood
- Easy pitching
- Stylish with unique prints
Cons:
- Canvas hem length could be slightly longer for uneven terrain
